Abū ’l-Khayr ash-Shajjār al-Ishbīlī / 11th century
Translation of Kitāb al-Filāḥa ou Le Livre de la Culture: notice et extraits traduits par A. Cherbonneau, éclaircissements par Henri Pérès (1946), Algiers: Editions Carbonel.
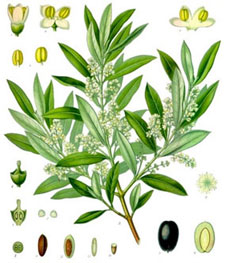
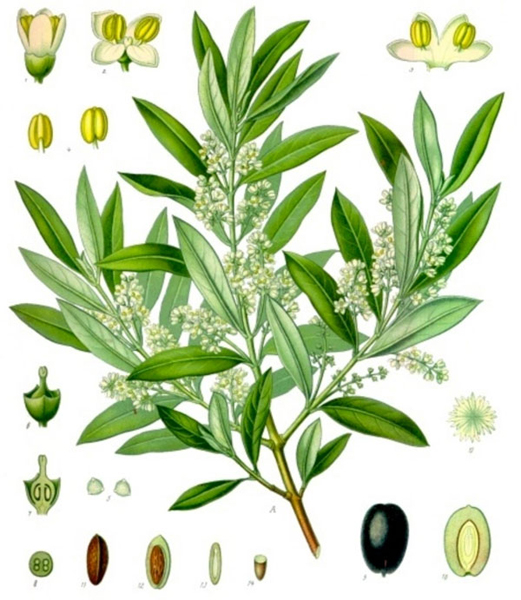
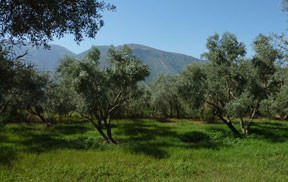
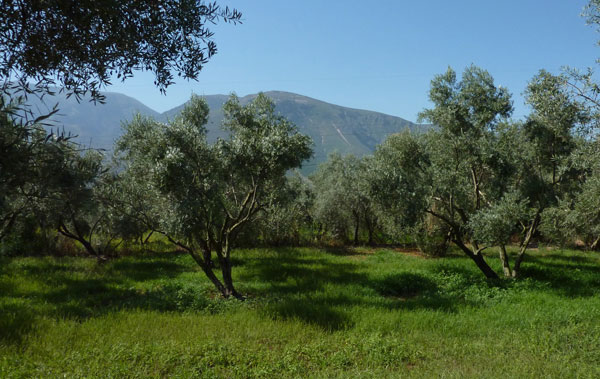
THE CULTIVATION OF THE OLIVE
Propagation
Olives may be propagated in three different ways.

Dry calcareous land, and poor, crumbly soils containing some gravel, as well as deep black, sandy lands are best for growing olives. Lowlands with a basically hot climate are not suitable.
The second method of propagating olives is by layering. This is the art of detaching suckers that usually grow around the foot of the main trunk and transplanting them individually, to form new plants. To this end one encourages, to the exclusion of all others, five or six good shoots at the foot of an old tree, then, when these shoots have grown for two years one lays them in the soil, without separating them from the main trunk, so that only their tips emerge above the surface. Once the covered section of the layer is considered to be adequately equipped with roots, it is carefully detached from the mother-tree and removed together with the soil that surrounds it so as not to disturb the young roots, which are still too delicate to be exposed. The depth of hole dug to receive the new tree should be proportionate to its size. This mode of propagation is the most common because it is the most successful in terms of results.
The third method is that of sowing, or propagation by stone or pit. For this one chooses olive stones that have the best appearance and which have not been subject to the corrosive action of salt. Then one takes a suitable pot and fills it with terre blanche [chalky clay], slightly stiff, taken from the mountains, mixed with well-rotted compost or manure. Plant the seeds in this mixture, taking care to cover them sufficiently so that they are not disturbed by watering nor affected by the air. It is important that this layer of soil is not too loose, nor likely to absorb too much water. This operation is carried out in October. It can be done later but then one must hasten and facilitate germination by slitting the stone before planting it, taking care not to damage the embryo. This method is very effective. It will give you, in less than four years, plants with stems as thick as the forefinger, which bear fruit. We know this from our own experience.
If you want to further hasten fruiting take the young stem of an olive obtained by seed and graft it onto an old tree of another species. If the graft takes, it will not be long before it produces. If you take the precaution of planting djoulnars3 and pomegranates nearby, the new tree will give you flowers and fruits that do not drop.
When the crop from an olive tree is not commensurate with its size and age, one can employ the following strategy to restore its fertility: uncover the foot of the tree, on the southern side, and dig a small trench towards the north. Take two offshoots from a very productive tree and plant them at the foot of the unproductive one, on either side of the trunk, in the trench. Cross these two stems when laying them in the trench and, after cutting the ends, cover them with clay mixed with hair. By this means one hopes that God will stimulate the unproductive tree.
Diseases of the Olive
When a diseased olive tree has not responded to any other treatment, try the following remedy to restore its health: Expose the foot of the tree and fill the hollow with manure mixed with olive stones that still retain some pulp. At the end of a year you can remove this mulch because the tree will have regained its natural vigour and fecundity.
It often happens that the fruits, before they mature, suffer from a disease as a result of which they wilt and fall. One can stop the effects of fruit drop by adopting the following procedure: Spread a layer of plant litter (bean stalks are best) around the foot of the affected tree, then water this litter with olive brine diluted with warm water.
You can also try another method: bore through the trunk of the tree and pass two stems, one of ash and the other of olive, through the hole, in the manner of a seton.
If a tree in good health is barren you can restore its productivity by watering it with a decoction of pulverized oak leaves. This remedy is infallible against sterility.
The Longevity of the Olive Tree
No tree lives as long as the olive. Credible people claim to have seen, on one of the plateaux of Syria, an olive-tree which was not less than three thousand years old, dating to the reign of Pharaoh. Abū Ḥanīfa ad-Dīnawarī4 relates, in his botanical treatise (Kitāb an-Nabāt), that he has seen in this same country, a temple whose foundation, attributed to the Greeks, was more than three thousand years ago and which was crowned by an olive tree as old as the building itself. But who knows the truth? The date palm lives almost as long as the olive; it is well-known that many have lived for 500 years.
Grafting5
The olive is grafted in the last two weeks of March. A scion of this tree grafted onto a vine stock produces sweet fruit, and vines planted between olive-trees give grapes that taste of olives.
Harvesting the Crop
Olives should be gathered before it gets cold and as soon as they take on a bluish tint. One should choose a mild day for this. Olives are harvested by hand, not with a pole, which bruises them, and then piled carefully in small heaps at the foot of the tree. They are harvested only as and when they are to be delivered, on the same day, to the press. In this way excellent oil is obtained. If, instead, they are left lying in a heap they will take on a bad smell which is passed on to the oil.
It may be, however, that one has to wait a few days between harvesting and pressing. In this case the olives should be sprinkled with salt in order to prevent fermentation. It also helps to place the olives in small heaps on a slight slope so that any oil which exudes can easily run off. Piled in this way and suitably salted they can keep, without deteriorating, for five or six days before pressing. A longer wait would render them unfit for the production of oil. They would yield a thick liquid with a strong and unpleasant smell.
Properties of the Olive6
The learned Al-Majūsī contends that olives produce an oil that is nutritious, strengthening and aphrodisiac. There are two types of olives: dry and oily (this difference depending perhaps on whether they are preserved in brine or in oil). Ibn al-Ḥabīb observes that the olive is cold, astringent and dry when it is not quite mature but possesses emollient properties at the peak of maturity. He advises chewing the leaves of the tree to get rid of phlegm and cure irritation of the gums and scorbutic ulcers. The doctor al-Manāṭiqī says that the green olive is astringent and that it refreshes and fortifies. The black olive, he says, is benign and mild. It contains warming properties that are very favourable to weak stomachs. However, over-consumption causes pains in the stomach and headaches. He reports that over-ripe olives are anti-digestive and advises against their use. The reddish olive (yākoutī) combines, according to him, the properties of both the green and the black olive. Preserved with honey and the zest of citron (utrunj7), it constitutes a very substantial food for the elderly.
Purification of the Oil
When olives intended for the production of oil have become soft and spoilt to the point of resembling soap they should only be sent to the press after being mixed with olive or fig leaves, or after being subjected to the heat of a blazing fire. The oil from this process of trituration comes out of the press thick and impure. It is clarified in the following way: Leave it to settle in a receptacle for five or six days, then slowly pour the mixture into another container into which you have placed a mixture of olive, citron and bay leaves crushed together. Soon the oil will clarify and lose its unpleasant odour. When olives have not reached perfect maturity they should be left to ferment in small piles for eight or ten days before being pressed, in order to bring the flesh to the point of softness that indicates ripeness.
Clarification of Thick Oil
Thick oil can be clarified by two different methods. The first is to boil the liquid in pots with a certain amount of salt; the second is to expose it to the sun, in jars, during the hottest weather, adding salt that has been crushed to a powder. In both cases one carefully removes, as and when it clarifies, the upper layer of oil, which always clarifies first.
If the oil has an unpleasant smell, this can be corrected by dropping in some boiling pitch which precipitates first to the bottom of the receptacle then comes up to the surface where it hardens. In its sinking and rising this substance rids the oil of its bad taste. In the absence of pitch one can use either green olives, slightly crushed, or pulverized olive leaves.
The various methods of purification given above are based on the principle that to clarify a fatty substance all you have to do is mix in some salt and then subject it to heat.
Regarding oil whose flavour is unpleasant, this calls for a little more care. If the process that we have recommended above does not produce a satisfactory result, the oil should be left to settle for two or three days in a receptacle containing a sachet of cumin. One can use coriander instead, dried in the shade and pulverized. Five or six days of treatment will suffice to rid the oil of any bad smell.
When olives are of poor quality, the oil is extracted as follows: once the fruits are picked they are taken to the press and laid, alternately, between beds of leaves taken from the same tree. The pressing of this mixture produces a tasty and pleasant oil.
Preparation of Olives in Brine
Take green olives that have been lightly crushed and scald them with boiling water. Then put them in a container with well-salted water and cover them with the leaves of bay, fennel and citron. A few days after this, add a little salt and a bundle of thyme.
Another method is to take olives in autumn and pit them with a pointed reed. Then wash them with plenty of water. Then put the fruit in a jar with leaves of thyme, mountain balm, bay, citron and mint. Fill with a liquid composed of one third drinking water and two thirds vinegar, well mixed, then seal the container until the olives are preserved.
A third method: gather good white olives in October and wash them as described above. Put them in a jar and sprinkle with salt, then with oil, then flavour with leaves of mint, thyme, coriander, fennel, citron and bay. Complete the process by covering the olives with a syrup of honey and vinegar. Finally, stuff the opening of the receptacle with the leaves of sumach and fennel and seal it tightly.
Preserving black olives
After washing the olives allow them to dry until the pulp begins to shrivel and wrinkle. Place them in a container layer by layer, pressing them down lightly with the hand and alternating with a layer of paste made from the following mixture: bay leaves, citron leaves, mountain balm, za‘tar, and thyme with olives, all pounded together with vinegar and reduced to a soft paste that is easy to spread. When you have filled the receptacle with successive layers of fruit and paste, wet the preserve with a well-beaten mixture of: 1 part vinegar, 2 parts oil, and 5 parts fresh water. Finally, cover the container with the leaves of bay and citron, and some quarters of quince. After 20 days the olives are ready to eat.
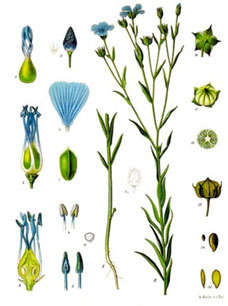

THE CULTIVATION OF FLAX
Flax thrives on sandy, well-rested land. It needs a very loose soil, requiring several successive ploughings at judicious intervals. To this end the soil is deep-ploughed in January. A second ploughing is done in February, and a third towards the middle of March, after which the land is left to rest until the last days of May so that the sun and wind can act on it and break it down. Taking advantage of a favourable day, the furrows are marked out and left open until the first rain, after which they are filled in during the process of opening up drills, smaller and closer to each other. It is in the latter that you sow, when the time comes.
This manner of preparing the ground suits the cultivation of all species of plants, save for the turnip which requires almost continual watering.
After harvesting the flax, the ground can be re-sown with beans, or barley, or wheat. However, in the latter case, the land should be turned over with the plough and be subjected to the scorching sun before being sown.
Winter flax or flax grown in the open fields is sown at the end of September or the beginning of October. For even, uniform sowing, choose a day of calm weather. If the wind rises during the operation, mix the seed with dry, pulverized soil and keep the hand close to the ground when sowing. The seed should not be covered too deeply. Draw the ploughshare lightly and slightly inclined along the crest of the furrows so that the seeds are hidden under a shallow layer of soil. In less than six or seven days you will see the new shoots emerge. Rain at this time can cause harm by uncovering the roots; but when the stem has grown strong it can only do good. It is essential to sow early, for several reasons: first, because the seed cannot withstand a long time in the earth before germination, and second, because it is essential that the plant has gained sufficient strength to withstand the cold of winter, which severely affects it. But the time of the solstice is the most appropriate because it induces germination and it allows the plant sufficient time before winter to gain enough strength to withstand the rigours of the cold.
Summer flax, grown under irrigation, is more pliant and silkier than hardy flax, and more useful for manufacturing. It is grown in the following way: If the soil is sandy and light it is manured before ploughing but if it is sticky and heavy it is only covered with manure after sowing, which takes place from 1st February up until the 15th May. When the ground has been ploughed, draw small furrows very close together in which the seed is sown and covered over, the same as for winter flax. When one has only spread manure over the surface, water it from time to time, if it does not rain, in order to hasten germination. Experience has shown that flax sown in February is always superior, in all respects.
The aspect of the land is important for the cultivation of this plant. North-sloping lands which receive less sunlight are less suitable. The best are those that get the most sun.
When irrigating flax, either in summer or winter, one should only use fresh running water. Brackish water causes great harm to the plant, when it does not kill it.
Diseases of Flax
When wind and hail have damaged the flax so that its leaves and stem take on a yellowish tinge, a sure sign of distress, it benefits from being watered with diluted pigeon manure, or sprinkled with pulverized pigeon manure, and afterwards watered.
Retting
The best way to steep or ret flax is to leave it to lie in still, fresh water. In this way the resinous gum that binds the fibres to the cortex of its soft, smooth stem is more easily loosened. If you wish to obtain white flax, let it steep in running water. If, on the contrary, you want a grey fibre, in its natural, unbleached colour, ret the flax in stagnant water into which you have thrown some handfuls of sheep’s dung.
Retting is accomplished when the stalk separates easily from the fibres which envelop it. This can be ascertained by taking some stalks and swirling them around vigorously in the water, or by running them through the fingers. When the fibres become detached without difficulty the retting is complete. The flax is then removed and made into little bundles which are set up so that all the water drains away.
When the flax is dry it is placed in well-ventilated open sheds so that it remains dry until braking or hackling. It is good practice also to protect it from rain and humidity before steeping, otherwise the delicate stalks are liable to overheat, thereby losing value.
Water that has been used once for retting is even better the second time around. The more it is used, the more effective it becomes. Thus it is in the interest of the flax producer not to ret all the harvest at one and the same time. He should arrange it so that he can use the same retting water for several successive batches, so that the later ones benefit from the advantages that accrue from the quality of the water. During the retting process the flax should be checked each morning. This precaution is to ensure that the flax does not remain in the water any longer than necessary. It is very harmful to exceed the time that is strictly necessary for steeping, whose purpose is only to separate the fibres from the actual stem.
To free the stems from the textile fibres which surround them they are mashed with big wooden mallets or iron bars. The textile fibres are gathered together in small bundles tied up with halfa8.
(Pancrace Bessa, 1772-1835)

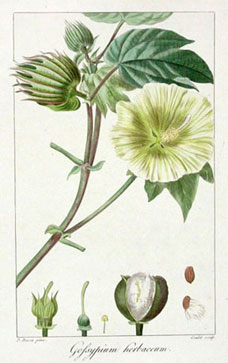
THE CULTIVATION OF COTTON
The cotton plant likes loose, broken up ground. The soil is prepared by several successive irrigations, after which it is ploughed deeply. It is necessary to dress the ground beforehand with well-rotted manure. Following the first ploughing, the soil is harrowed several times until it is as loose as possible. The people of Sicily (Ciqilliya), who follow this method, harrow up to ten times. When this tillage has loosened the ground sufficiently the beds are laid out to receive the seeds.
The rainy season is the most favourable for sowing. If however the ground is not sufficiently moistened, rainfall must be supplemented by watering. In this case, one sows only when the water has had time to soak into the earth and has dried out again. Sowing is done as follows: Seeds are sown individually, or broadcast, so that each is about a span apart. In the latter case, the seeds should be separated from the down that surrounds them so that a uniform scattering can be achieved. To do this the seed is first dampened, then sifted with dry, powdered earth or manure. The seeds are thus separated from all their down and do not cling together. After sowing the seed is watered until the shoots emerge from the ground.
When the plants reach the height of a span, the ground is given a light hoeing to rid it of weeds. Then they are left to grow until they are three-quarters developed. Then irrigation is resumed up until the beginning of August, taking care, after each watering, to draw up the soil around the foot of the plants to guard against dryness. The plant is then at its peak. It continues to grow but expends its energy at the expense of its pods so growth is arrested by cutting off the end of each branch, which is lopped off with a very flexible switch some four spans long. This operation causes the sap to flow back into the main stem and stimulates the production of numerous buds which would not otherwise have developed.
Cotton is harvested in September, preferably on the coolest mornings. This however has the disadvantage in that the bolls may be damp when harvested, though this can be remedied by spreading them, after harvesting, in a dry and well-ventilated place until they are moisture-free.
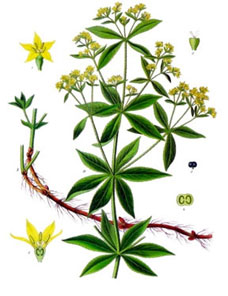

THE CULTIVATION OF MADDER
The land in which madder is to be grown is manured well, then ploughed three times in succession at intervals of fifteen days. The land is then divided into beds and given the first irrigation. When the ground has dried it is levelled, then sown. Sowing should be done so that there are no more than three seeds per span.
As soon as the shoots appear, give a light hoeing to remove any weeds. When the plants have reached the height of a finger, water them, hoe again, then let them grow until they have gained strength.
During the summer, water once a week. Stop watering at the approach of autumn because then the ground retains sufficient moisture to meet the needs of the madder and there is a danger of making the soil too wet as winter approaches.
Madder is sown in March. It prefers chalky-clay soil [les terres blanches], a little sticky and well manured.
During the month of August in the second year the stalks which have seeded are collected and the ground is covered with a layer of soil four fingers thick to protect the plants against the cold of winter and to encourage the buried part of the stem to grow roots. This is the main reason why it is done.
If there is a pressing need for the madder it can be pulled up in September of that year, in which case one should leave some roots in the ground. These quickly repopulate the land and give a harvest as abundant as if one had not harvested anything previously. This practise is all the more advantageous as it produces a double harvest on the same fertilizer and the same ground preparation.
In addition to sowing there is another way of growing madder - that of planting. To this end trenches are dug in which the roots of madder are planted, spaced one third of a span apart. At the same time two or three seeds are put in each hole so that if the root comes to nothing there will be no empty spaces. Care during growth is the same as that given to seedlings.
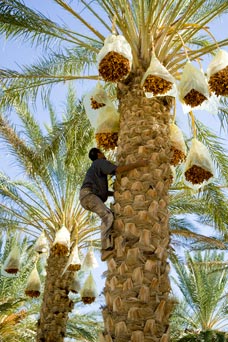

CULTIVATION OF THE DATE-PALM
Propagation by seed or stone
Take dates with their flesh on, carefully slit the stones, and plant in sandy, saline ground. A hole is dug one cubit deep and filled with earth mixed with sand, salt, and faecal matter in the proportion of four pounds of salt to two baskets (couffins9) of soil and a quarter of each of the other substances. The date-stone is placed in the middle of this mixture so that the tip of the embryo is facing upwards. It is covered with a light layer of soil and watered twice a week until the shoot appears above ground.
In the autumn, the plant is unearthed with great care and wrapped in faecal matter containing a strong dose of salt.
At the beginning of the third year the seedling can withstand transplanting. A hole is prepared to receive the young tree. It is removed with the soil around its roots and carried to its new home, taking all appropriate precautions. After transplanting, the young palm is watered twice a week, taking care not to get water on the leaves, which only need to be watered during the solstice, when the sap is most active.
| 1 | A span is about twenty centimetres, the distance between the tip of the thumb and little finger with the hand outstretched. |
| 2 | Casthos or Costus was the author of Kitāb al-Filāḥa ar-Rūmiyya (‘The Book of Greek Agriculture’) which was translated into Arabic many times (cf. Clément-Mullet, introduction to the French translation of the Book of Agriculture of Ibn al-‘Awwām, I, 71-72). |
| 3 | djoullanār : the flower of the male pomegranate or ‘balauste’; here the flower is used for the tree, the ‘balaustier’ or wild male pomegranate. |
| 4 | Arab philologist and naturalist who died in 282 / 895 (cf. Encyclopedia of Islam, I, 1004, sv. Al-Dīnawarī, art. of C. Brockelmann) |
| 5 | This paragraph of four lines is not by Abū ’l-Khayr, but from Ibn al-Ḥusayn. |
| 6 | This paragraph of 22 lines is not the work of Abū ’l-Khayr, but that of Ibn al-Ḥusayn. |
| 7 | The text of Cherbonneau reads ‘citron’ (atrondje) |
| 8 | Cherbonneau’s note: Abū'l-Khayr, in expounding on the usefulness of flax, says: “If in life wheat occupies the first place, flax, without a doubt, comes second; for the dead, no less than the living, cannot do without it”. |
| 9 | Cherbonneau’s note: the French word ‘couffin’ comes from the Arabic qouffa, ‘a basket without handles, made from the leaves of the dwarf palm’. |
(Translated from the French by A.H. Fitzwilliam-Hall, September 2010) | |